How to Capture a Screenshot on Mac: A Comprehensive Guide
Are you tired of searching for ways to capture a screenshot on your Mac? Look no further! In this article, we will explore the various methods to take a screenshot on your Mac, including keyboard shortcuts, Screenshot app, and Grab Utility tool.Why Take a Screenshot on Your Mac?
Taking a screenshot on your Mac can be useful in many situations. Whether you want to save an important message, share a funny moment with friends, or document an issue for technical support, knowing how to take a screenshot is essential.Method 1: Using Keyboard Shortcuts
Moving forward, it's essential to keep these visual contexts in mind when discussing How To Capture Screenshot On Mac.
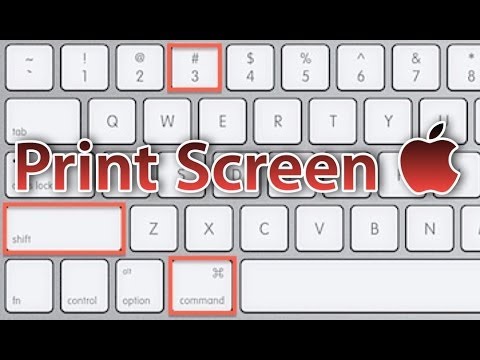
Keyboard shortcuts are the quickest way to take a screenshot on your Mac. Here are the steps to follow:- Press Command + Shift + 3 on your keyboard.
- Release all keys to capture the entire screen, including the Dock, top menu bar, and everything else.
- Alternatively, press Command + Shift + 4 to capture a selected portion of the screen.
Method 2: Using Screenshot App

- Open the Screenshot app by clicking on the Launchpad icon in the dock and searching for Screenshot.
- Click on the camera icon to capture a screenshot of the entire screen.
- Alternatively, click on the icon with a + sign to capture a selected portion of the screen.
Method 3: Using Grab Utility Tool

- Open the Grab Utility tool by clicking on the Launchpad icon in the dock and searching for Grab.
- Click on the camera icon to capture a screenshot of the entire screen.
- Alternatively, click on the icon with a + sign to capture a selected portion of the screen.
- Click on the "Record" button in the Control Center.
- Choose the area of the screen you want to record.
- Click on the record button to start recording your screen.
- Stop the recording by clicking on the square button.
- QuickTime Player
- ScreenFlow
- Socket


 - iGeeksBlog")


: Complete Methods & Tips")

